Connect Website Chathead
Want to let website visitors chat with your AI Agent without leaving your site?
![]()
The Website Chathead adds a floating chat icon to the bottom-right corner of your website. When visitors click it, a chat window opens instantly — allowing them to ask questions, browse products, and get help from your AI Agent in real-time. No app downloads, no redirects, just seamless conversation.
Let’s add your AI-powered chat widget in just a few minutes. 🚀
Why Add a Website Chathead?
Section titled “Why Add a Website Chathead?”- 💬 Engage visitors instantly — Customers can ask questions without leaving your site
- ⚡ 24/7 availability — Your AI Agent responds even when your team is offline
- 🎯 Reduce bounce rates — Keep visitors engaged with immediate answers
- 🛍️ Boost conversions — Guide customers through purchases right on your website
- 🎨 Match your brand — Customize the chat widget color to fit your site design
A website chat widget is one of the most effective ways to capture leads and convert visitors into customers. With DealDroid, you get the power of AI-driven conversations embedded directly into your website.
Before You Begin
Section titled “Before You Begin”Make sure you have:
- ✅ Access to your website’s HTML — You’ll need to add code snippets to your site
- ✅ A DealDroid account with at least one Droid (AI Agent) already created
- ✅ Basic knowledge of where to find your website’s
<head>and<body>tags
Note: If you use a website builder like WordPress, Shopify, or Wix, you can usually add custom code through their settings panel.
Step 1: Navigate to Channels and Create Website Embed
Section titled “Step 1: Navigate to Channels and Create Website Embed”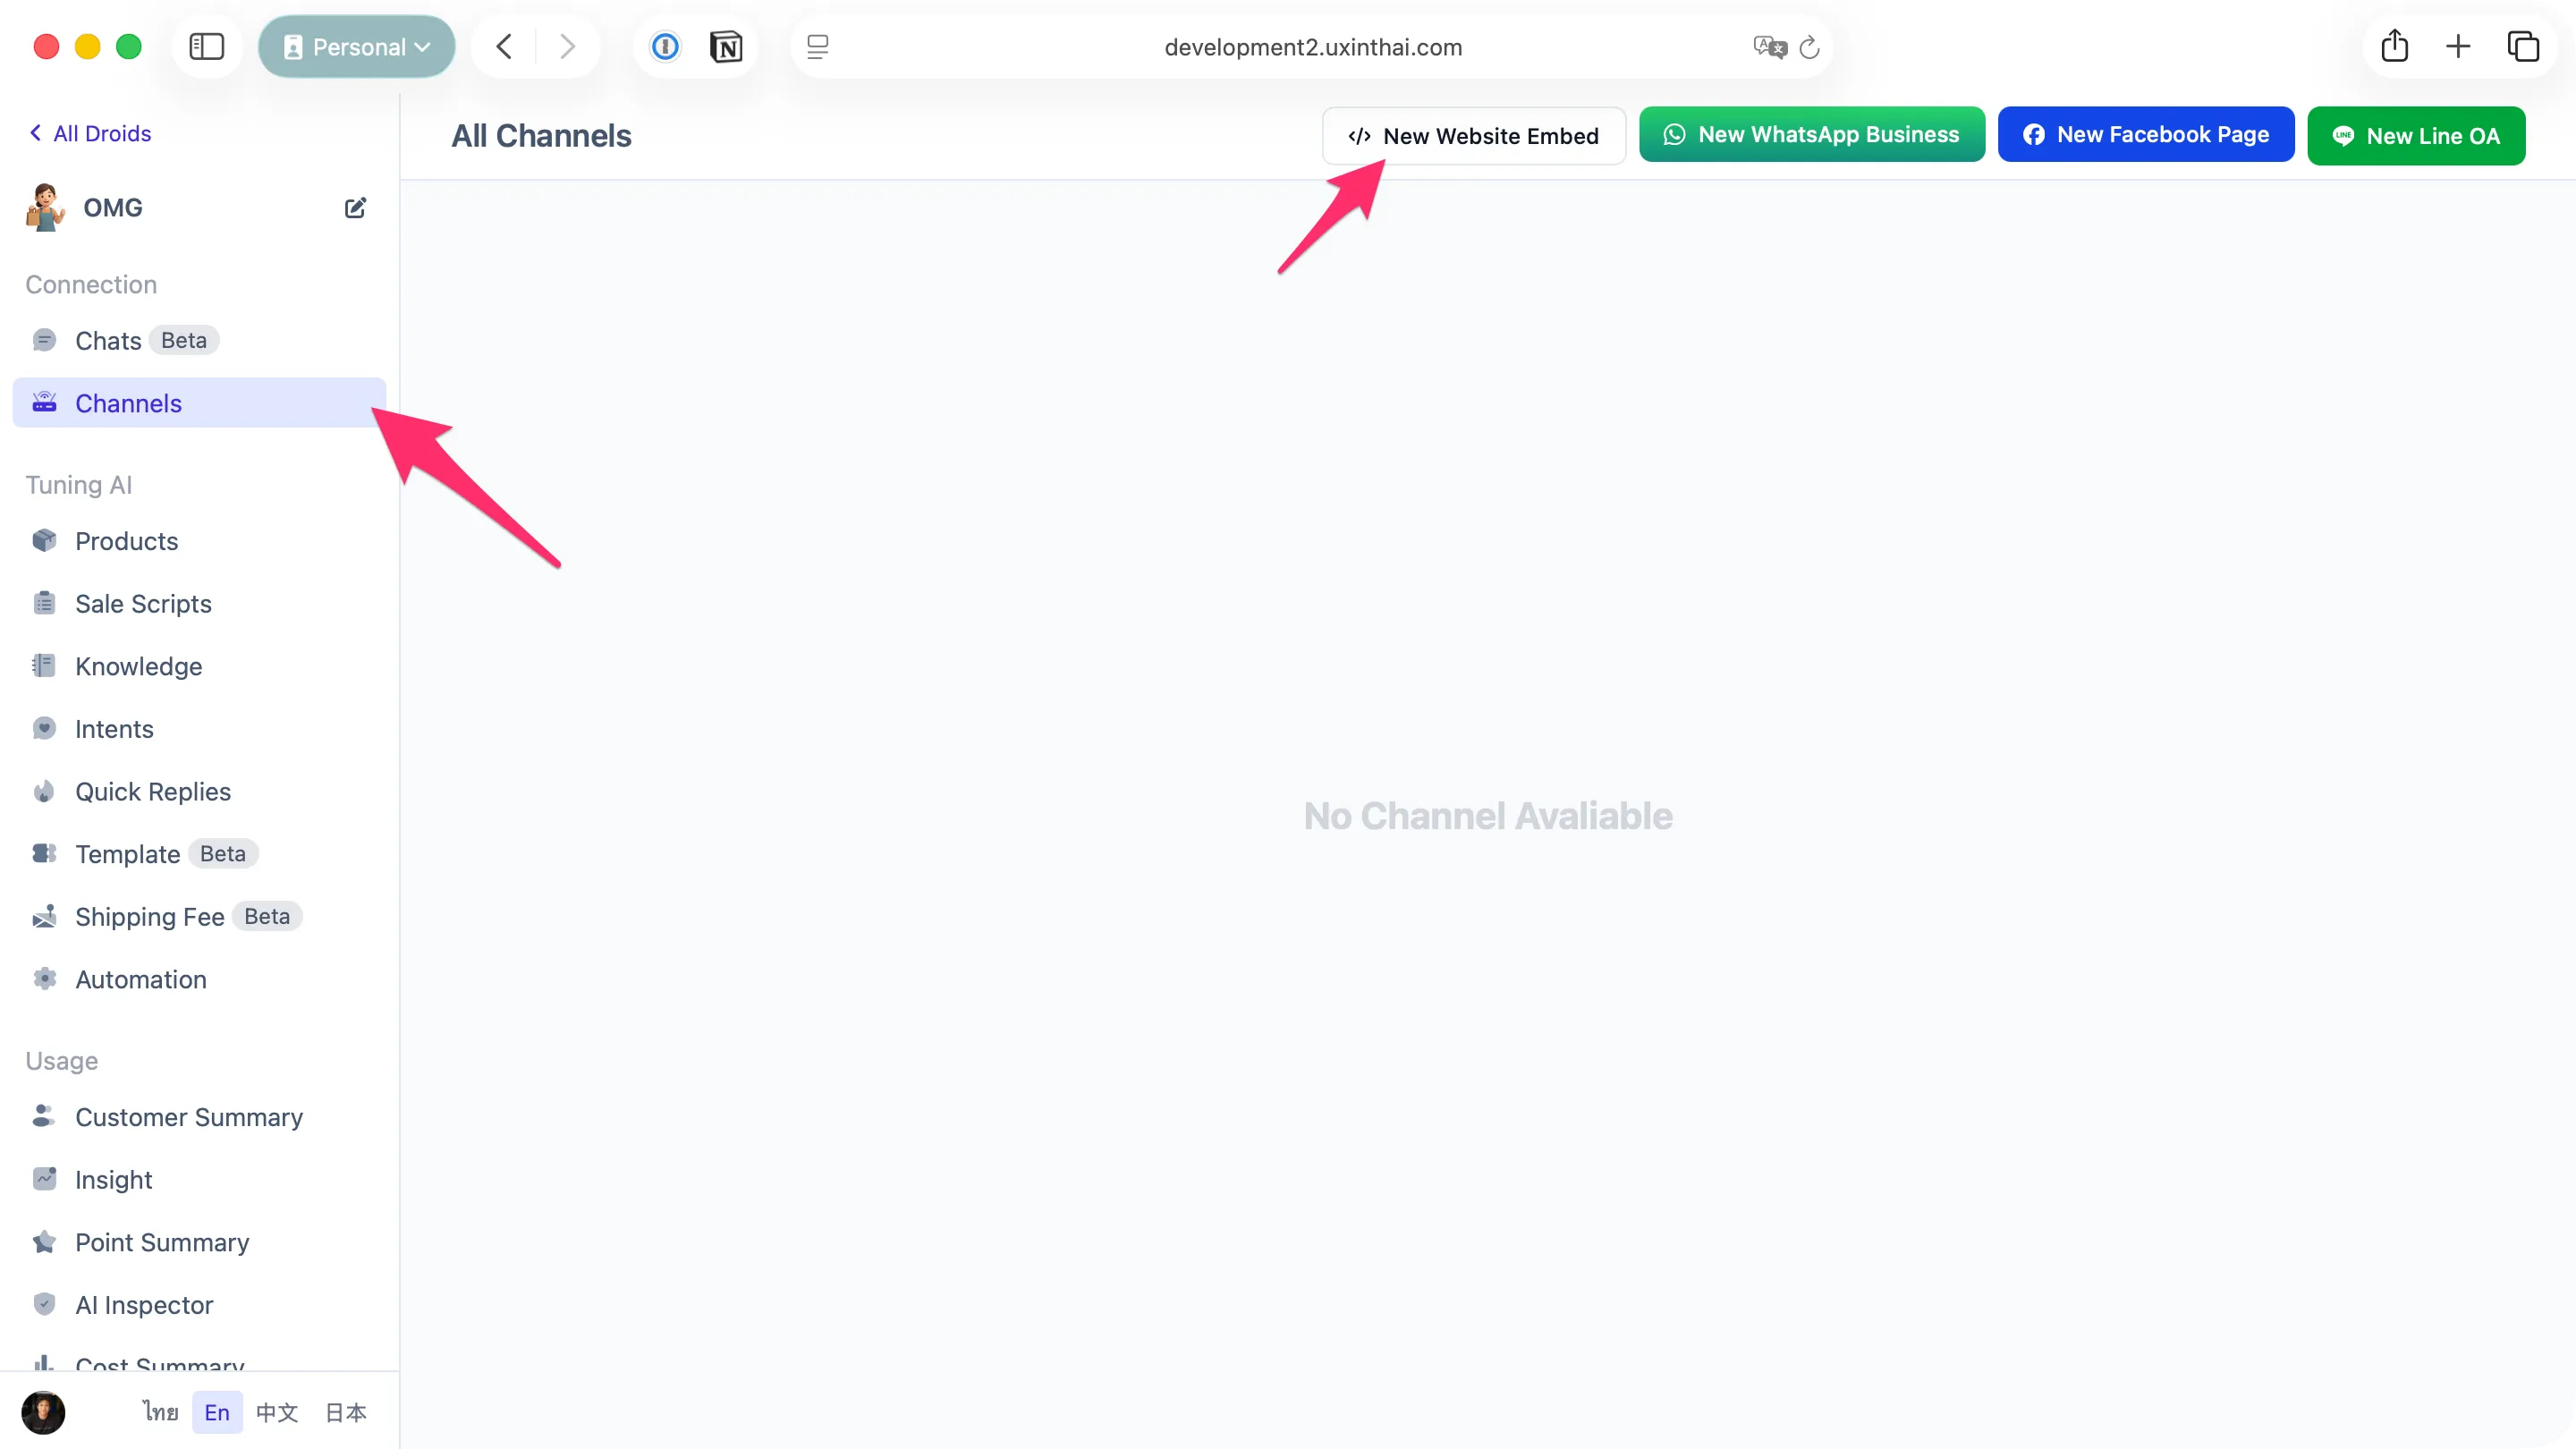
- Log in to your DealDroid dashboard
- Click on Channels in the left sidebar menu (highlighted with arrow)
- You’ll see the “All Channels” page showing any channels you’ve already connected
- Click the New Website Embed button (highlighted with arrow)
Step 2: Configure Your Chat Widget
Section titled “Step 2: Configure Your Chat Widget”
After clicking New Website Embed, you’ll see a configuration form with the following options:
Channel Name
Section titled “Channel Name”Give your channel a memorable name to identify it in your dashboard.
- Default: “Web Channel”
- Example: “Main Website Chat” or “Product Page Widget”
Tip: Use descriptive names if you plan to embed chat widgets on multiple websites or sections.
Primary Color
Section titled “Primary Color”Choose a color that matches your website’s branding. The chat icon and header will use this color.
- Click the color picker to select your preferred color
- The color code updates automatically (e.g.,
425067) - The embed scripts update in real-time as you change the color
Enable Channel
Section titled “Enable Channel”Toggle this option to control whether your chat widget is active:
- Enabled — Your AI Agent will respond to visitor messages
- Disabled — The chat icon still appears, but your AI Agent won’t respond
Tip: Use the disable feature when you need to temporarily pause the chat without removing the code from your website.
Step 3: Add the Code to Your Website
Section titled “Step 3: Add the Code to Your Website”DealDroid provides two code snippets that you need to add to your website. Each snippet serves a specific purpose and should be placed in a specific location.
CSS Stylesheet — Add Before </head>
Section titled “CSS Stylesheet — Add Before </head>”Copy the CSS link and paste it inside your <head> section, before the closing </head> tag:
<link rel="stylesheet" href="http://happyhead.dealdroid.net/assets/index.css" />Why place CSS in the <head>?
- CSS in the
<head>loads before the page content renders - This prevents a “flash of unstyled content” where the chat widget appears broken momentarily
- Your chat icon will look correct from the moment it appears
JavaScript — Add Before </body>
Section titled “JavaScript — Add Before </body>”Copy the JavaScript snippet and paste it just before the closing </body> tag:
<script type="module" src="http://happyhead.dealdroid.net/assets/index.js?scriptId=script_sample&color=425067"></script>Why place JavaScript at the bottom?
- JavaScript at the bottom of
<body>loads after all page content - This ensures your main content loads first, improving perceived page speed
- The chat widget initializes after the page is ready, preventing any blocking
Complete Example
Section titled “Complete Example”Here’s how your HTML structure should look with both snippets in place:
<!DOCTYPE html><html>  <head>    <title>Your Website</title>    <!-- Your existing stylesheets -->    <link rel="stylesheet" href="your-styles.css" />
    <!-- DealDroid Chat Widget CSS -->    <link      rel="stylesheet"      href="http://happyhead.dealdroid.net/assets/index.css"    />  </head>  <body>    <!-- Your website content -->    <header>...</header>    <main>...</main>    <footer>...</footer>
    <!-- Your existing scripts -->    <script src="your-scripts.js"></script>
    <!-- DealDroid Chat Widget JavaScript -->    <script      type="module"      src="http://happyhead.dealdroid.net/assets/index.js?scriptId=script_sample&color=425067"    ></script>  </body></html>
Why Two Separate Files?
Section titled “Why Two Separate Files?”You might wonder why we don’t combine everything into a single script. Keeping CSS and JavaScript separate gives you more control:
- 🎨 Style customization — Override or extend the default styles with your own CSS
- ⚡ Loading control — Decide exactly when each resource loads
- 🔧 Conditional loading — Load the chat widget only on specific pages
Example Use Cases
Section titled “Example Use Cases”Load chat only on product pages:
<script> if (window.location.pathname.includes("/products")) { const script = document.createElement("script"); script.type = "module"; script.src = "http://happyhead.dealdroid.net/assets/index.js?scriptId=script_sample&color=425067"; document.body.appendChild(script); }</script>Delay loading until user scrolls:
<script> let chatLoaded = false; window.addEventListener("scroll", function () { if (!chatLoaded && window.scrollY > 300) { chatLoaded = true; const script = document.createElement("script"); script.type = "module"; script.src = "http://happyhead.dealdroid.net/assets/index.js?scriptId=script_sample&color=425067"; document.body.appendChild(script); } });</script>You’re All Set! 🎉
Section titled “You’re All Set! 🎉”Your AI Agent is now live on your website!
Once you’ve added both code snippets and saved your changes, the chat icon will appear in the bottom-right corner of your website. Visitors can click it to start chatting with your AI Agent immediately.
Your AI will handle:
- 💬 Visitor questions — Answer inquiries about products, services, and policies
- 🛍️ Product recommendations — Suggest items based on visitor needs
- 🎯 Sales conversations — Guide visitors toward purchases
- 📞 Support requests — Handle common support questions automatically
Testing Your Chat Widget
Section titled “Testing Your Chat Widget”Want to make sure everything works? Here’s how to test:
- Open your website in a browser
- Look for the chat icon in the bottom-right corner
- Click the icon to open the chat window
- Send a test message like “Hello” or “What do you sell?”
- Your AI Agent should respond within seconds
If you don’t see the chat icon:
- ✅ Check that both code snippets are added correctly
- ✅ Verify the snippets are in the correct locations (
<head>and<body>) - ✅ Clear your browser cache and refresh the page
- ✅ Check your browser’s developer console for any errors
If the icon appears but you don’t get responses:
- ✅ Make sure Enable Channel is turned on in DealDroid
- ✅ Verify that a Droid is assigned to this channel
- ✅ Check that your Droid has Knowledge Base and Products configured
Regenerating Your Script
Section titled “Regenerating Your Script”Need to generate a new script ID? Click the Regenerate button in the channel settings.
After regenerating:
- Copy the new CSS and JavaScript snippets
- Replace the old code on your website with the new snippets
- Save and deploy your website changes
Tip: Only regenerate if you suspect your script ID has been compromised or you need a fresh start.
Advanced Customization 🎨
Section titled “Advanced Customization 🎨”Want to customize the chat widget’s title, welcome message, or suggested questions? You can override the default settings by adding a window.ChatHeadConfig object before the DealDroid script.
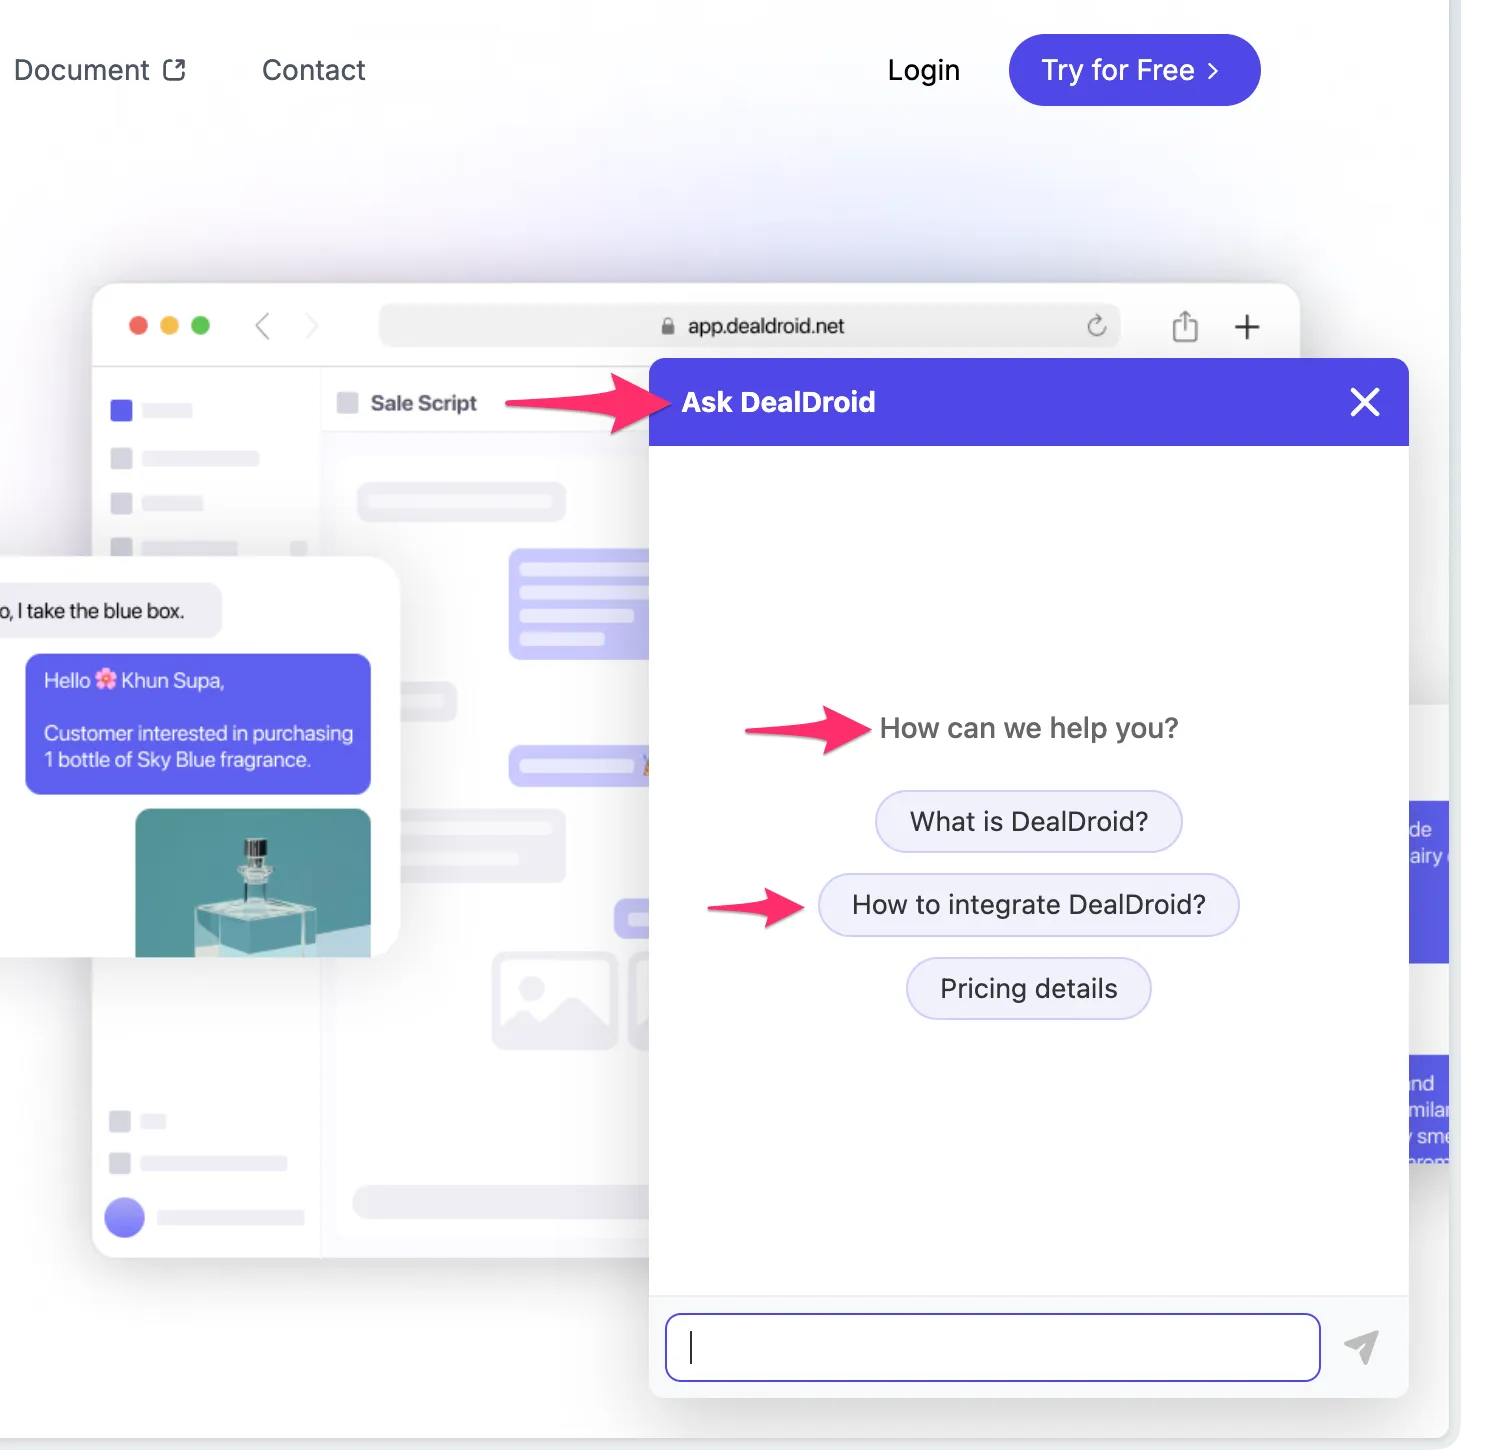
Here’s how your code would look with custom configuration:
<body>  <!-- Your website content -->  <header>...</header>  <main>...</main>  <footer>...</footer>
  <!-- DealDroid Chat Configuration -->  <script>    // @ts-ignore - Prevents TypeScript errors in IDEs    window.ChatHeadConfig = {      scriptId: "script_xxxxxx",      title: "Ask DealDroid",      openTitle: "How can we help you?",      theme: {        primary: "#4f46e5",      },      openQuestions: [        "What is DealDroid?",        "How to integrate DealDroid?",        "Pricing details",      ],    };  </script>
  <!-- DealDroid Chat Widget JavaScript -->  <script    type="module"    src="https://happyhead.dealdroid.net/assets/index.js?scriptId=script_xxxxxxx"  ></script></body>
Important: The
ChatHeadConfigscript must be placed before the DealDroid widget script to work correctly.
ChatHeadConfig Fields Explained
Section titled “ChatHeadConfig Fields Explained”Here’s what each field does and how to use it effectively:
scriptId
Section titled “scriptId”Required. Your unique script identifier from the DealDroid dashboard.
- Must match the
scriptIdin your JavaScript URL - Get this from your channel settings in DealDroid
Example: "script_xaugxgesi6a"
The text displayed in the chat widget header.
Tips:
- Keep it short and friendly (2-4 words)
- Make it clear it’s a chat or help feature
- Use your brand name or product name
Examples:
"Ask DealDroid""Chat with Us""Pet Store Helper""Coffee Shop Assistant"
openTitle
Section titled “openTitle”The welcome message shown above the suggested questions when the chat opens.
Tips:
- Make it inviting and action-oriented
- Use a question format to engage visitors
- Keep it conversational and friendly
Examples:
"How can we help you?""What are you looking for today?""Need help finding something?""Ready to order?"
openQuestions
Section titled “openQuestions”An array of suggested questions that appear as clickable buttons when the chat opens. Visitors can tap these instead of typing.
Tips:
- Choose 3-5 of your most common questions
- Make them specific and actionable
- Match the questions to your business goals
- Use natural, conversational language
Examples:
// E-commerce storeopenQuestions: [  "What's on sale today?",  "Do you offer free shipping?",  "How do I track my order?",  "What's your return policy?",];
// RestaurantopenQuestions: [  "What's today's special?",  "Do you have vegetarian options?",  "Can I make a reservation?",  "What are your hours?",];
// SaaS productopenQuestions: [  "How does pricing work?",  "Can I try it for free?",  "What integrations do you support?",  "How do I get started?",];
theme.primary
Section titled “theme.primary”The primary color for your chat widget (chat icon, header, buttons).
Tips:
- Use hex color codes (e.g.,
"#4f46e5") - Match your brand colors for consistency
- The widget automatically adjusts text color for readability
Example: "#4f46e5" (indigo blue)
Note: Custom theme colors only work in light mode. In dark mode, the chat widget uses a neutral gray color scheme to match the system appearance.
theme.onPrimary (Optional)
Section titled “theme.onPrimary (Optional)”The chat widget includes automatic accessibility features! If you choose a light primary color, the text automatically becomes dark for readability. If you choose a dark primary color, the text becomes light. This ensures your chat is readable for all visitors.
However, if you want to specify the text color yourself, you can use theme.onPrimary to define your preferred text color.
Example:
theme: { primary: "#4f46e5", onPrimary: "#ffffff" // Force white text}Real-World Example: Pet Store
Section titled “Real-World Example: Pet Store”Here’s a complete example showing how a pet store might customize their chat widget:
<!DOCTYPE html><html>  <head>    <title>Paws & Claws Pet Store</title>    <link      rel="stylesheet"      href="http://happyhead.dealdroid.net/assets/index.css"    />  </head>  <body>    <!-- Your pet store website content -->    <header>      <h1>🐾 Paws & Claws Pet Store</h1>    </header>    <main>      <!-- Product listings, etc. -->    </main>
    <!-- Pet Store Chat Configuration -->    <script>      // @ts-ignore - Prevents TypeScript errors in IDEs      window.ChatHeadConfig = {        scriptId: "script_pawsandclaws123",        title: "Pet Store Helper",        openTitle: "What can we help you find today?",        theme: {          primary: "#10b981", // Green to match pet/nature theme        },        openQuestions: [          "What's best for a new puppy?",          "Do you have organic cat food?",          "Show me dog toys",          "What are your store hours?",        ],      };    </script>
    <!-- DealDroid Chat Widget -->    <script      type="module"      src="http://happyhead.dealdroid.net/assets/index.js?scriptId=script_pawsandclaws123"    ></script>  </body></html>
With this setup:
- The chat header shows “Pet Store Helper” instead of a generic title
- Visitors see a friendly “What can we help you find today?” message
- The suggested questions are tailored to pet owners’ common needs
- The green color (#10b981) matches the natural, pet-friendly brand theme
Configuration Priority
Section titled “Configuration Priority”Important to know: Settings in ChatHeadConfig will override the URL parameters.
For example:
<!-- ChatHeadConfig overrides parameter to purple (#4f46e5) --><script>  window.ChatHeadConfig = {    theme: {      primary: "#4f46e5", // This wins!    },  };</script>
<!-- URL parameter sets color to blue (#425067) --><script src="...index.js?scriptId=script_sample&color=425067"></script>
Tip: Use
ChatHeadConfigfor full customization, or stick with URL parameters for simple color changes.
What’s Next?
Section titled “What’s Next?”Now that your website chat is connected, here’s what you can do:
- Test thoroughly — Try different questions to see how your AI responds
- Customize the experience — Use ChatHeadConfig to match your brand
- Add more knowledge — Train your AI with FAQs and business information
- Upload products — Add your catalog so your AI can recommend products
- Connect more channels — Add LINE, Facebook Messenger, or WhatsApp
Need Help?
Section titled “Need Help?”If you encounter any issues during setup or have questions about the website integration, our support team is here to help. Reach out anytime!
Your AI sales agent is ready to engage with website visitors. Let’s start converting those conversations into sales! 😊