Define Customer Tags
Want to organize customers for easy access and seamless team collaboration? The Tag system lets you quickly label each customer, making it easier for you and your team to work together efficiently.
Currently, tagging is manual, but an automatic tagging system is coming soon!
Why Tags Matter
Section titled “Why Tags Matter”- 🏷️ Organize customers quickly — Tag customers to group them however you need
- 👥 Collaborate easily — Everyone on your team sees the same tags and knows who each customer is
- 🔍 Search faster — Filter customers by default tags to find who you need instantly
- 📝 Remember easily — Add meaningful tags to recall what’s special about each customer
- 🤖 Future-ready — AI will be able to auto-tag based on the descriptions you provide
Difference Between Default Tags and Custom Tags
Section titled “Difference Between Default Tags and Custom Tags”Default Tags
- Pre-defined in Settings > Business Rules
- All team members can use them immediately
- Can be used to filter customers in Chat page
- Include descriptions to help the team understand when to use them
Custom Tags
- Can be added instantly without pre-configuration
- Perfect for specific, one-off cases
- Currently used for team communication only (not searchable yet)
- If you delete a default tag from Settings, existing tags become custom tags
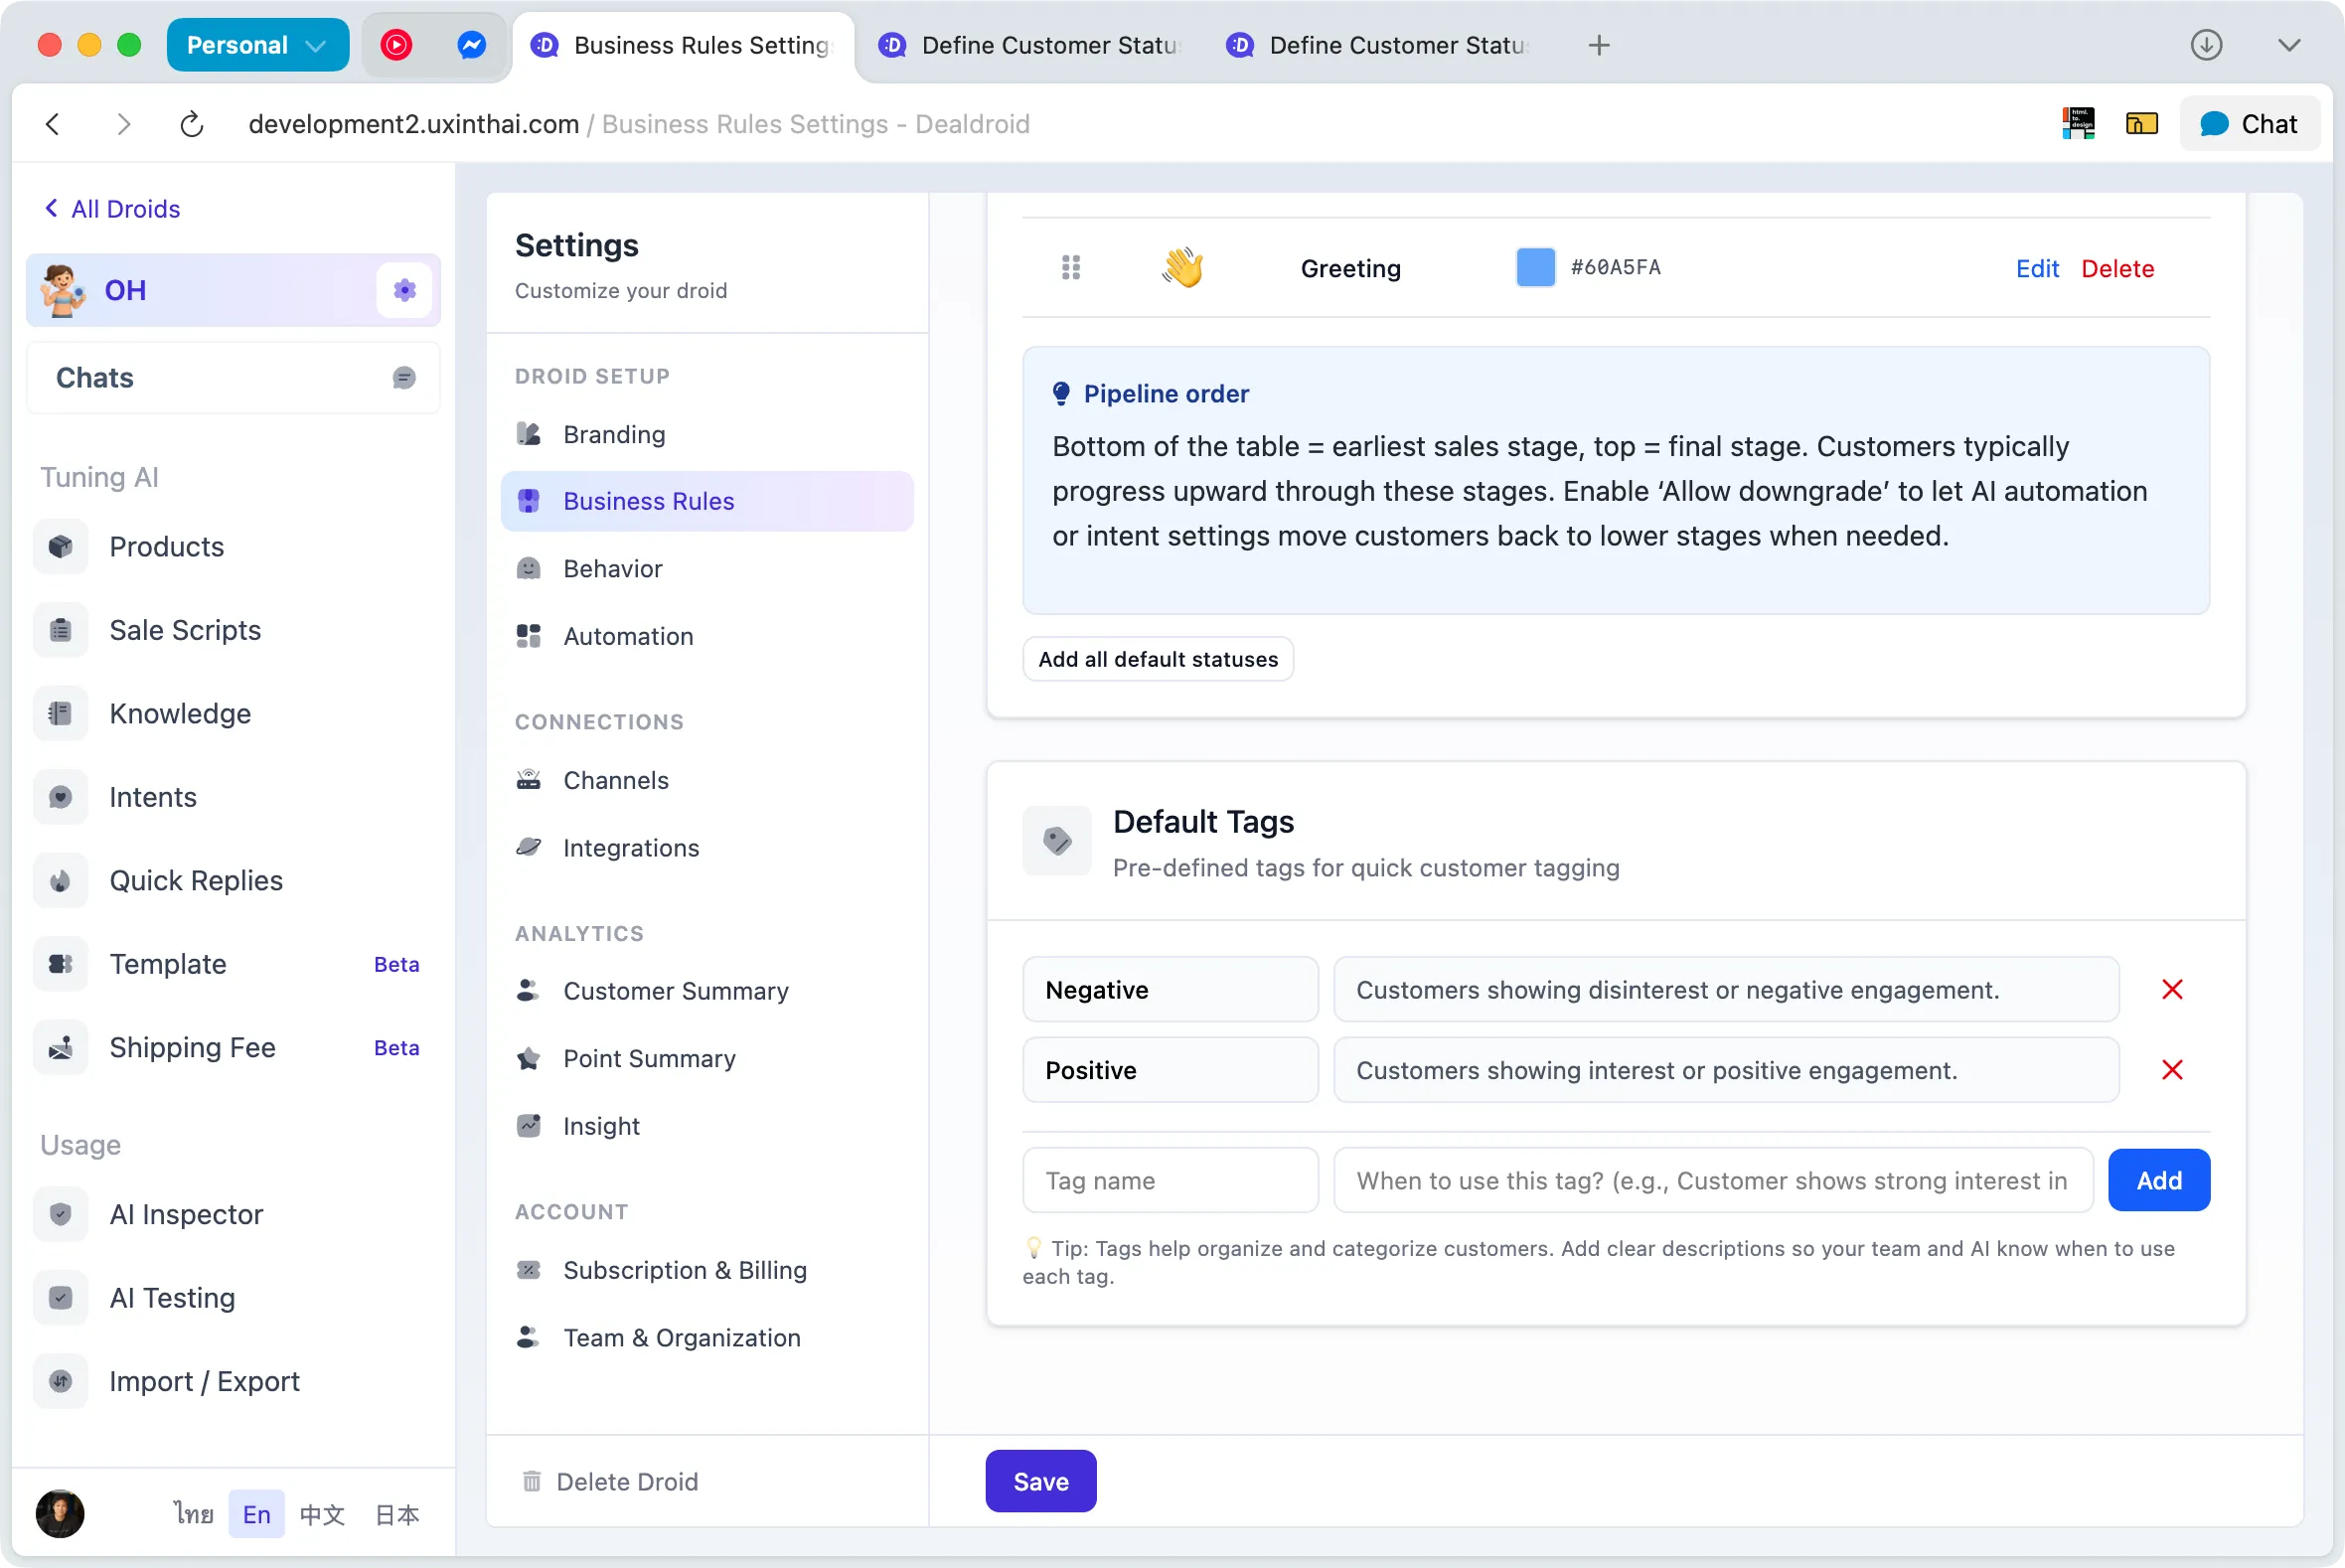
How to Set Up Default Tags
Section titled “How to Set Up Default Tags”Step 1: Access Business Rules
Section titled “Step 1: Access Business Rules”- Go to Settings > Business Rules
- Look for the Tag Settings section
Step 2: Add a New Tag
Section titled “Step 2: Add a New Tag”When adding a default tag, you need to provide:
Tag Name
Section titled “Tag Name”The name that will be displayed to your team and AI
Examples: VIP Customer, Urgent, Follow Up, Interested in Cat Food
💡 Tip: Use short, concise names that clearly convey the meaning
Tag Description
Section titled “Tag Description”The description serves two important purposes:
- For your team — Helps team members understand when to use this tag
- For AI — In the future, AI will read this description to automatically tag customers
Examples:
Tag: VIP CustomerDescription: Customers who purchase over $150 worth of products or buy regularly every month. They should receive special service and extra care.Tag: Follow UpDescription: Customers who are interested in products but haven't decided yet. Need to follow up with additional answers within 2-3 days.Tag: UrgentDescription: Customers who need products urgently or have issues that must be resolved today. Should respond as quickly as possible.⚠️ Important: Write clear and detailed descriptions because AI will use this information for automatic tagging in the future
Step 3: Save the Tag
Section titled “Step 3: Save the Tag”Once you’ve filled in the information:
- Click the Save button to save the tag
- The tag will appear in the default tag list immediately
- All team members can now use this tag
How to Tag Customers
Section titled “How to Tag Customers”Step 1: Select a Customer in Chat Page
Section titled “Step 1: Select a Customer in Chat Page”- Go to the Chat page
- Click to select the customer you want to tag
- Customer details will appear on the right side

Step 2: Click Edit Tag
Section titled “Step 2: Click Edit Tag”- Find the Tag section in customer details
- Click the pencil icon to open edit mode
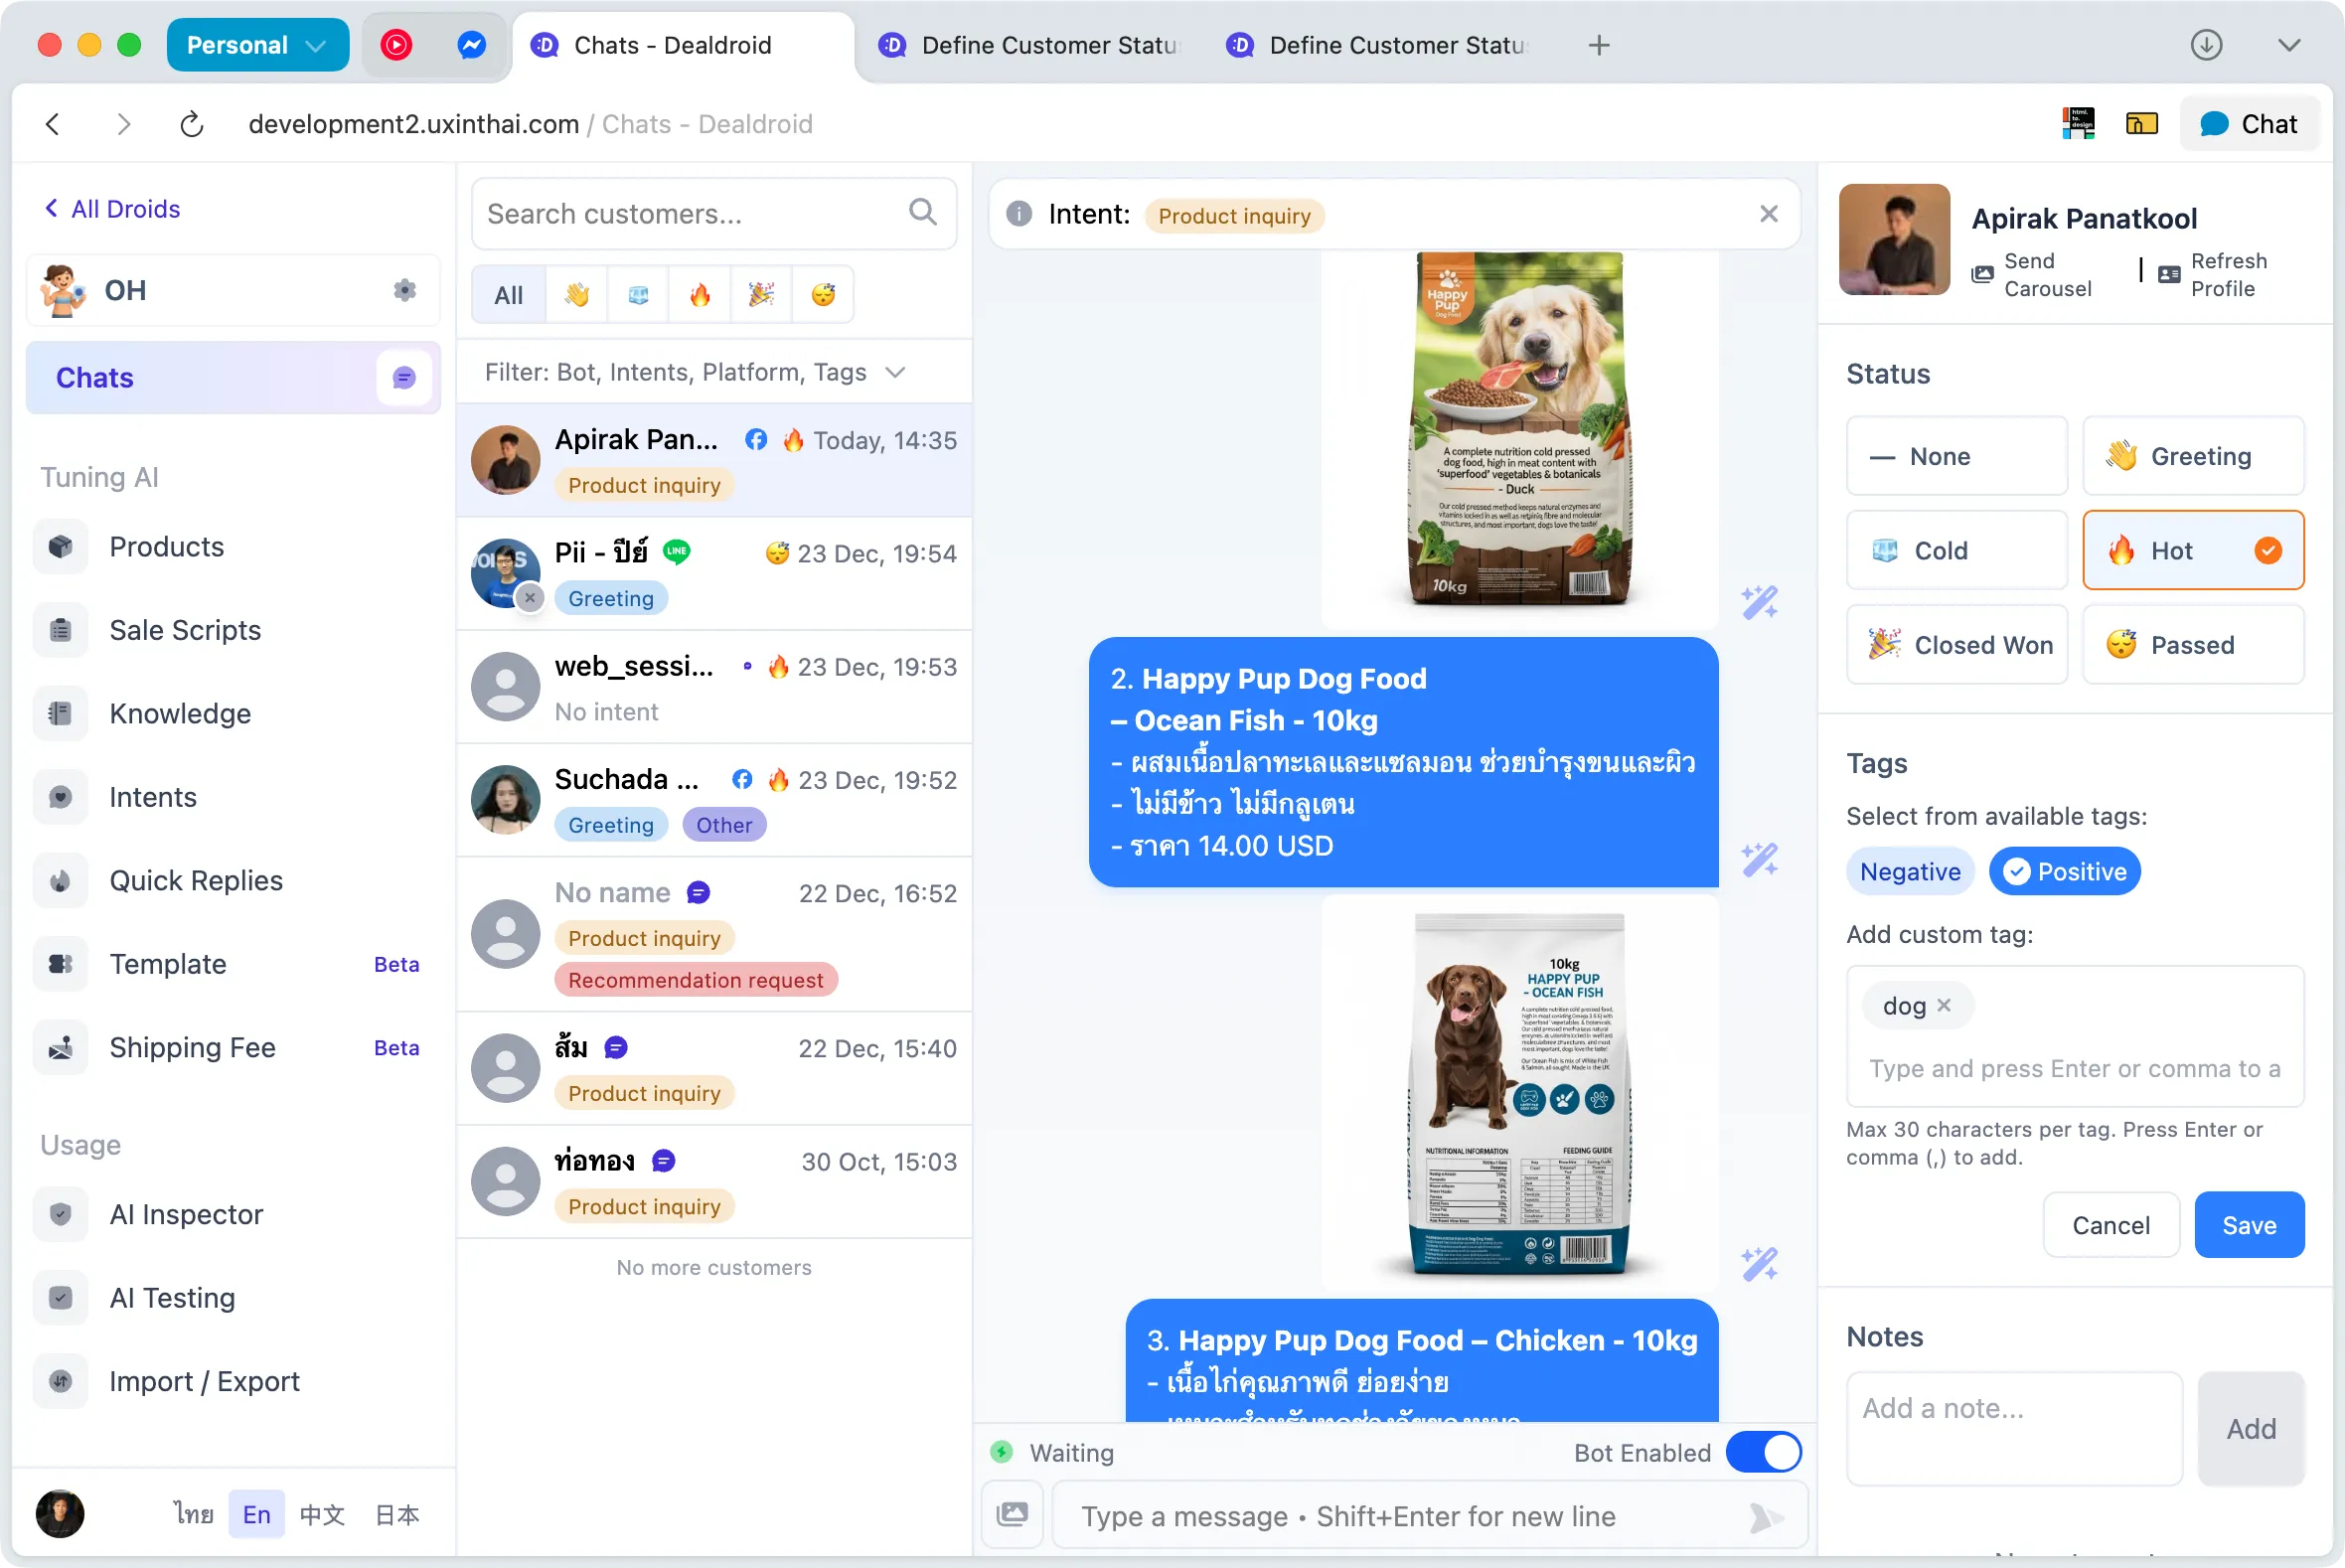
Step 3: Add or Edit Tags
Section titled “Step 3: Add or Edit Tags”When edit mode is open, you’ll see:
Default Tags (at the top)
Section titled “Default Tags (at the top)”- Pre-defined tags from Settings
- Click to select immediately
- Can select multiple tags at once
Custom Tags (freeform)
Section titled “Custom Tags (freeform)”- Type any new tag name without pre-configuration
- Add as many as you want (no limit)
- Perfect for special cases where you need to remember specific customer information
Note: Custom tags are currently for team communication only and cannot be used for filtering or searching
Step 4: Save
Section titled “Step 4: Save”- Once you’ve selected all tags, click Save
- Tags will be saved and displayed in customer details immediately
- All team members can see the tags
💡 Tip: Everyone on your team can add and edit customer tags, regardless of who added them originally
How to Filter Customers by Tags
Section titled “How to Filter Customers by Tags”Use Filter in Chat Page
Section titled “Use Filter in Chat Page”- Go to the Chat page
- Click the Filter button above the customer list (on the left)
- Select the default tags you want to filter by
- You can select multiple tags at once
- The customer list will show only those with the selected tags
Note: Filtering only works with default tags. Custom tags cannot be used for filtering at this time
Tips for Using Tags Effectively
Section titled “Tips for Using Tags Effectively”1. Set Up Default Tags Based on Actual Use
Section titled “1. Set Up Default Tags Based on Actual Use”Design tags that fit your business needs:
Example for a Pet Store:
First Time Buyer— New customers who haven’t purchased yetRegular Customer— Loyal customers who buy frequentlyHigh Value— Customers who make high-value purchasesNeed Follow Up— Requires additional follow-upAfter Sales Care— Customers who’ve purchased and need post-sale care
2. Write Clear Descriptions
Section titled “2. Write Clear Descriptions”To prepare for AI auto-tagging:
✅ Good:
Tag: High ValueDescription: Customers who purchase products totaling $150 or more, or buy more than 3 items at once. Should receive special discounts and free shipping.❌ Not Good:
Tag: High ValueDescription: Important customers3. Use Tags with Status
Section titled “3. Use Tags with Status”Tags and Status work well together:
- Status tells you where the customer is in the buying process (Hot Lead, Cold Lead, Closed)
- Tag provides additional information about the customer (VIP, Urgent, Follow Up)
Example: A customer might have:
- Status:
Hot Lead(ready to buy) - Tags:
VIP Customer,Need Follow Up Today
4. Communicate with Team Through Tags
Section titled “4. Communicate with Team Through Tags”Use tags to send messages to teammates:
@John - Please handle— Assign to a teammateWaiting for shipping info— Waiting for shipping detailsPrice match requested— Customer requested price matching
5. Clean Up Tags Regularly
Section titled “5. Clean Up Tags Regularly”- Remove unused default tags (existing tags will become custom tags)
- Merge tags with duplicate meanings
- Update descriptions to match current usage
Things to Know
Section titled “Things to Know”Tags Don’t Show in Customer List
Section titled “Tags Don’t Show in Customer List”Tags only appear in customer details on the right side, not in the All Chats list on the left
Auto-Tagging is Coming
Section titled “Auto-Tagging is Coming”Currently, tags must be added manually, but in the future AI will be able to automatically tag customers based on the descriptions you provide
Custom Tags Aren’t Searchable Yet
Section titled “Custom Tags Aren’t Searchable Yet”The current filtering system only works with default tags. Custom tags are for recording information and internal team communication
Ready to organize your customers systematically? Start by setting up default tags that fit your business! 🏷️