Receiving Message Webhooks
Want to know exactly when your customers send messages? Webhooks let your DealDroid bot send real-time notifications to your server for every message — allowing you to build custom integrations, track conversations, and create powerful automation workflows.
What Are Webhooks?
Section titled “What Are Webhooks?”Think of webhooks as a doorbell for your app. Every time a customer sends a message to your Droid, DealDroid will instantly send a POST request to your server with all the message details.
Common use cases:
- 📊 Analytics & Tracking — Log every conversation for analysis
- 🔔 Custom Notifications — Alert your team via Slack, Discord, or email
- 💾 Database Integration — Store messages in your own database
- 🤖 Third-Party Automation — Trigger workflows in tools like Zapier or Make
- 🔍 Quality Monitoring — Review AI responses in real-time
Step 1: Configure Your Webhook Settings
Section titled “Step 1: Configure Your Webhook Settings”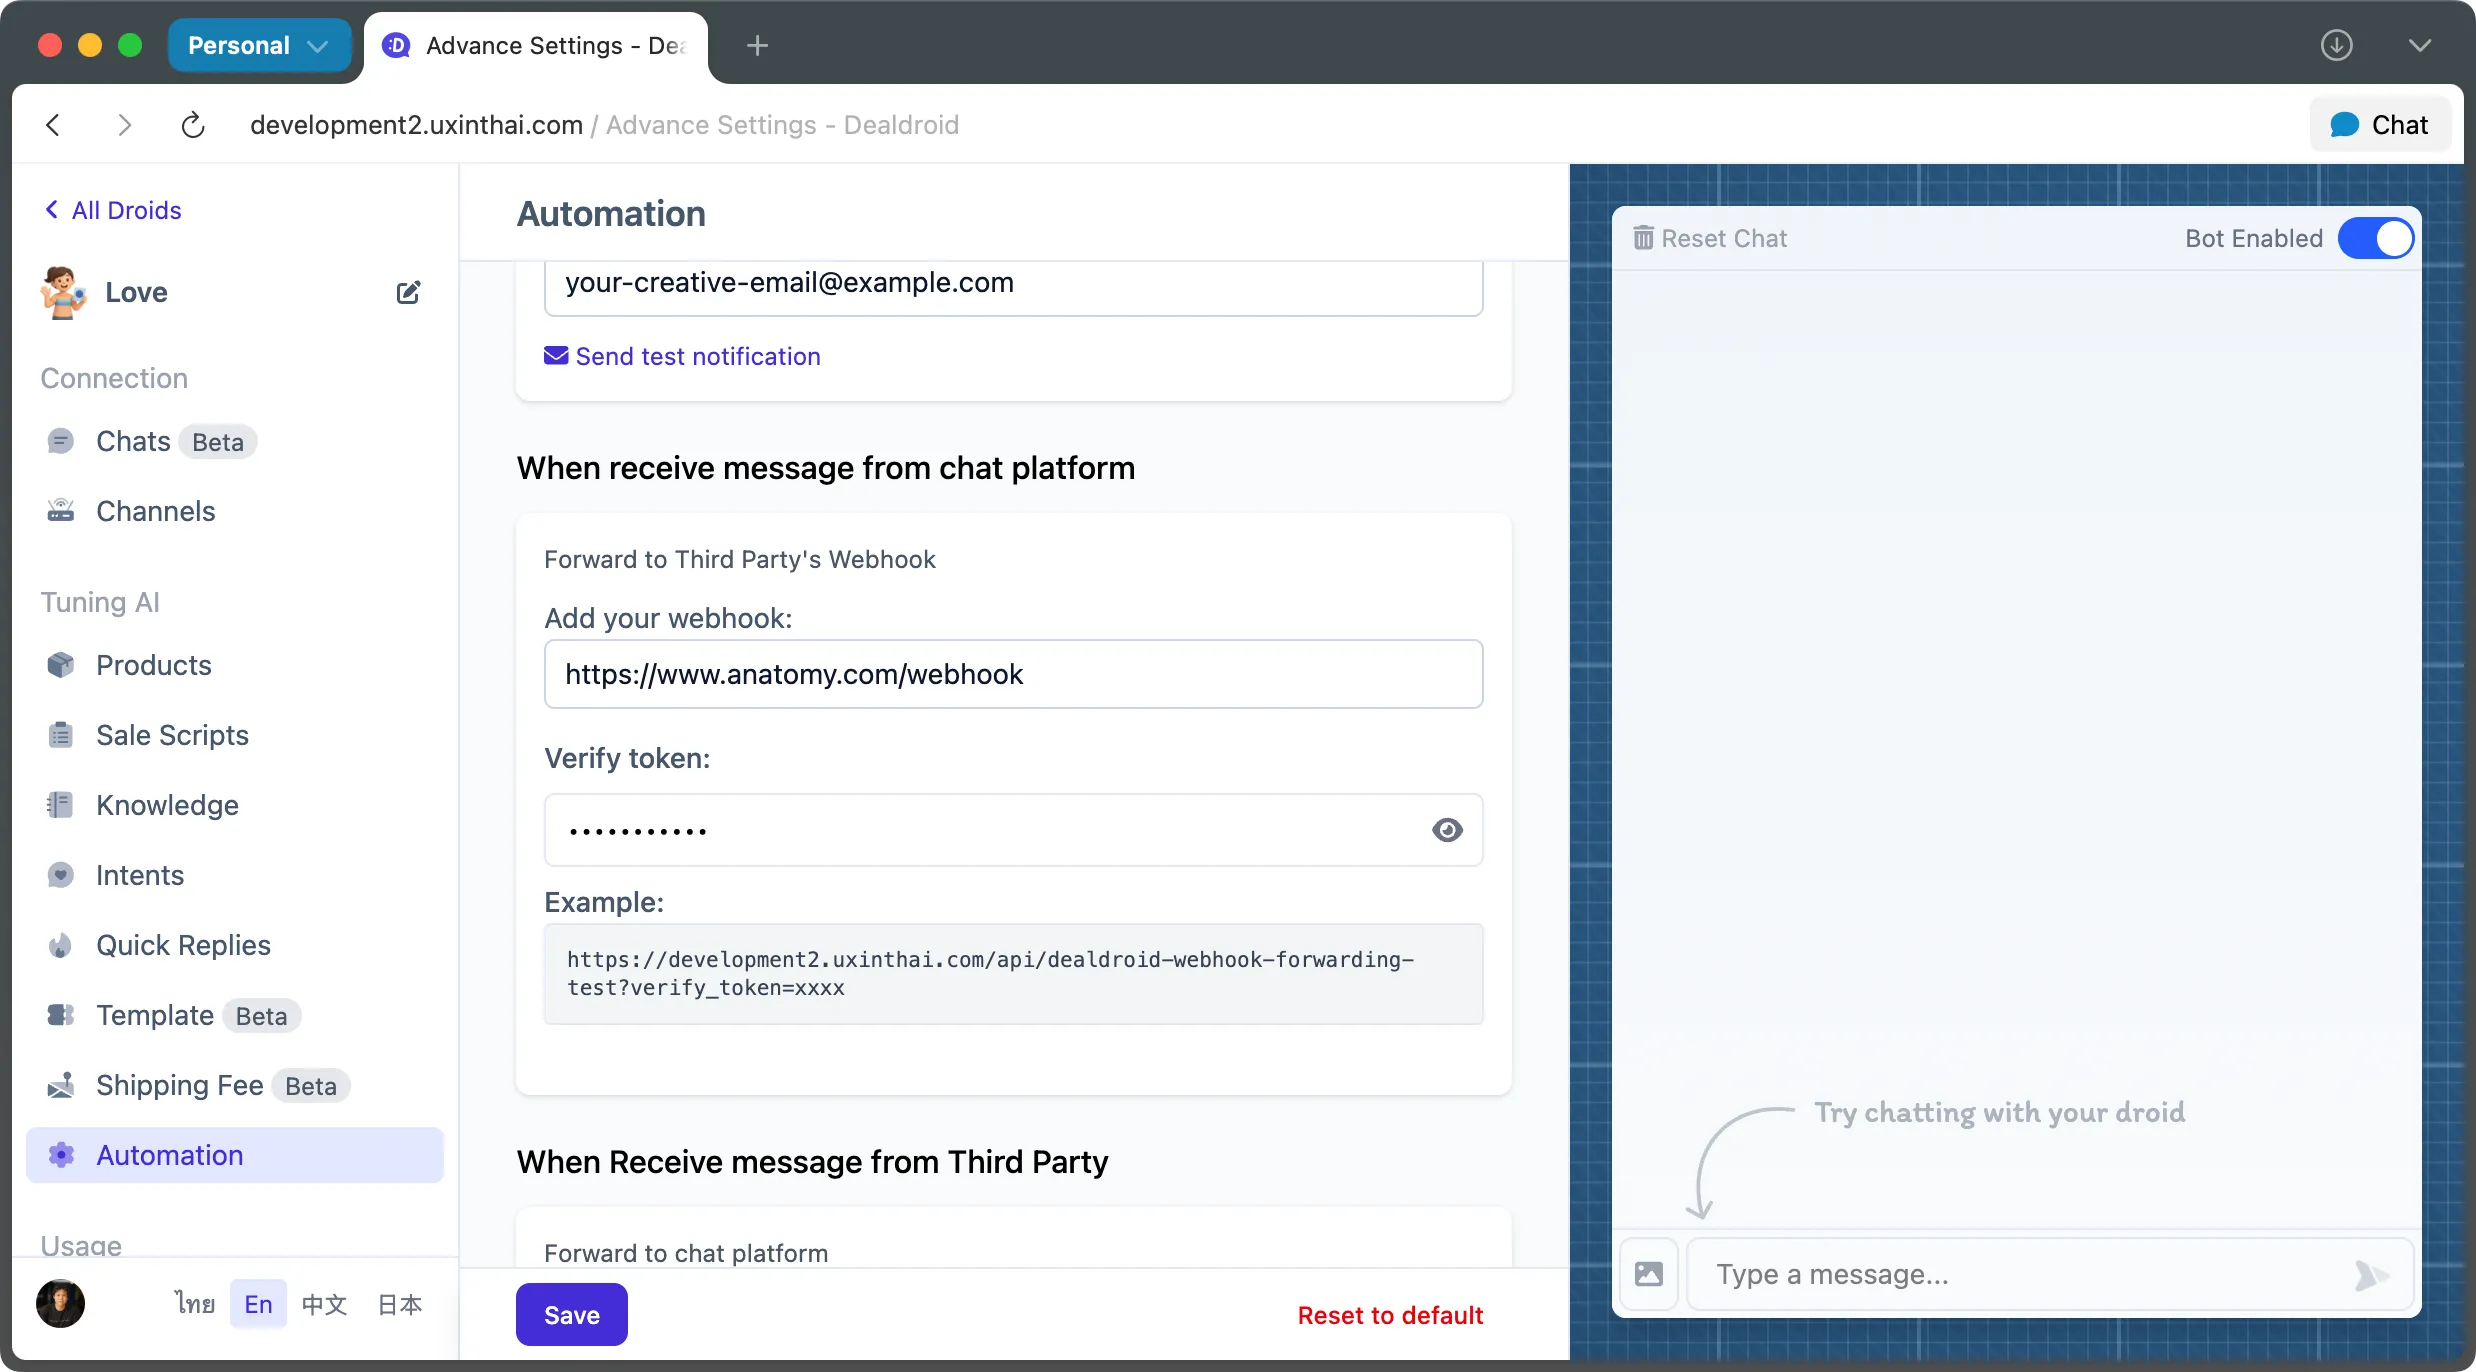
Navigate to the Automation Panel in your DealDroid dashboard and configure two essential settings:
1. Webhook URL
Section titled “1. Webhook URL”This is the public URL of your server endpoint that will receive the webhook POST requests.
Example: https://your-server.com/webhook
Requirements:
- Must be publicly accessible (DealDroid needs to reach it)
- Must use HTTPS (for security)
- Should respond quickly (within 5 seconds)
2. Verify Token
Section titled “2. Verify Token”Create a unique verification token to authenticate webhook requests. DealDroid will include this token in every webhook request, allowing you to verify that the message is legitimately from your DealDroid bot.
Example: your_verify_token_here_2024
Best practices:
- Use a long, random string (at least 32 characters)
- Store it securely as an environment variable
- Never commit it to version control
- Rotate it periodically for security
Step 2: Understanding the Webhook Request
Section titled “Step 2: Understanding the Webhook Request”When a message is sent or received, DealDroid will make a POST request to your webhook URL with the verify token attached as a query parameter.
Request URL Format
Section titled “Request URL Format”https://your-server.com/webhook?verify_token=your_verify_token_here_2024Important: Always verify the verify_token query parameter matches your configured token before processing the request. This ensures the webhook is genuinely from your DealDroid bot.
Step 3: Understanding the Request Body
Section titled “Step 3: Understanding the Request Body”Every webhook request contains a JSON payload with detailed information about the message.
TypeScript Type Definition
Section titled “TypeScript Type Definition”type MessageForwarding = { // Reference IDs mid: string; chatId: number; customerId: number; droidId: number; channelId: number;
// Message Content type: "human" | "ai" | "system" | "log" | "admin"; content: { type: "text" | "image" | "button" | "carousel"; value: string | string[]; alt?: string; };
// Metadata note?: string; createdAt: string; // ISO 8601 timestamp};Example Webhook Payload
Section titled “Example Webhook Payload”{ "mid": "ddtp-ckz9abc123xyz", "chatId": 12345, "customerId": 67890, "droidId": 11122, "channelId": 33445, "type": "human", "content": { "type": "text", "value": "Hello, I have a question about your products!" }, "note": "", "createdAt": "2025-08-04T12:30:00.000Z"}Field Reference Guide
Section titled “Field Reference Guide”Reference IDs
Section titled “Reference IDs”| Field | Type | Description |
|---|---|---|
mid | string | Unique identifier for this specific message |
chatId | number | Unique ID for the conversation thread |
customerId | number | Unique ID for the end-user |
droidId | number | Unique ID for your bot |
channelId | number | Unique ID for the communication channel (Facebook, LINE, etc.) |
Message Type
Section titled “Message Type”The type field indicates who sent the message:
| Value | Description |
|---|---|
human | Message from the customer |
ai | Message from your DealDroid bot |
system | System notification or event |
log | Internal log message |
admin | Message from a human agent/admin |
Content Object
Section titled “Content Object”The content object contains the actual message payload:
| Field | Type | Description |
|---|---|---|
type | string | Format of the message content |
value | string or string[] | The message content itself |
alt | string (optional) | Alternative text for accessibility |
Content Types
Section titled “Content Types”| Type | Value Format | Example |
|---|---|---|
text | string | "Hello, I have a question" |
image | string (URL) | "https://example.com/image.jpg" |
button | string[] (array) | ["Apple", "Orange", "Banana"] |
carousel | string | "Send carousel to user" |
Metadata
Section titled “Metadata”| Field | Type | Description |
|---|---|---|
note | string (optional) | Any notes associated with the message |
createdAt | string | ISO 8601 timestamp of when the message was created |
Step 4: Implement Your Webhook Endpoint
Section titled “Step 4: Implement Your Webhook Endpoint”Now it’s time to build your server endpoint to receive and process webhooks. Here’s a complete example using Node.js and Express.
Complete Node.js + Express Example
Section titled “Complete Node.js + Express Example”import express from "express";
const app = express();const PORT = process.env.PORT || 3000;
// Store your verify token securely as an environment variableconst VERIFY_TOKEN = process.env.VERIFY_TOKEN || "your_verify_token_here";
// Middleware to verify the tokenconst verifyToken = (req, res, next) => { const providedToken = req.query.verify_token;
if (providedToken !== VERIFY_TOKEN) { console.warn("Unauthorized webhook attempt with invalid verify token"); return res.status(403).send("Forbidden: Invalid verify token."); }
next();};
// Middleware to parse JSON bodiesapp.use(express.json());
// Define the webhook endpointapp.post("/webhook", verifyToken, (req, res) => { const message = req.body;
console.log("✅ Webhook received successfully"); console.log("Message ID:", message.mid); console.log("Message Type:", message.type); console.log("Content:", message.content); console.log("Created At:", message.createdAt);
// Add your custom logic here processMessage(message);
// Always respond quickly to avoid timeouts res.status(200).send("Webhook processed.");});
// Your custom processing logicfunction processMessage(message) { // Example: Only process messages from humans if (message.type === "human") { console.log( `Customer ${message.customerId} said: ${message.content.value}`, );
// Add your custom logic: // - Save to database // - Send notification to Slack // - Trigger analytics event // - Call external API }}
// Start the serverapp.listen(PORT, () => { console.log(`🚀 Webhook server is running on port ${PORT}`); console.log( `📡 Ready to receive webhooks at http://localhost:${PORT}/webhook`, );});How It Works
Section titled “How It Works”- Security First: The
verifyTokenmiddleware checks theverify_tokenquery parameter before processing any request - JSON Parsing: Express automatically parses the JSON body
- Message Processing: Your custom
processMessagefunction handles the webhook payload - Quick Response: The server responds with
200 OKimmediately to acknowledge receipt
Step 5: Testing Your Webhook
Section titled “Step 5: Testing Your Webhook”Local Testing with ngrok
Section titled “Local Testing with ngrok”If you’re developing locally, use ngrok to expose your local server to the internet:
# Install ngrok (if not already installed)brew install ngrok
# Start your local servernode server.js
# In another terminal, expose itngrok http 3000
ngrok will give you a public URL like:
https://abc123def.ngrok.ioUse this URL in your DealDroid webhook configuration:
https://abc123def.ngrok.io/webhookTest with Real Messages
Section titled “Test with Real Messages”- Configure your webhook URL and secret in DealDroid
- Send a test message to your Droid via Facebook, LINE, or your website chat
- Check your server logs to verify the webhook was received
- Verify the data is correct
Expected log output:
✅ Webhook received successfullyMessage ID: ddtp-ckz9abc123xyzMessage Type: humanContent: { type: 'text', value: 'Hello!' }Created At: 2025-08-04T12:30:00.000ZCommon Integration Examples
Section titled “Common Integration Examples”Save Messages to Database (MongoDB)
Section titled “Save Messages to Database (MongoDB)”import mongoose from "mongoose";
const MessageSchema = new mongoose.Schema({ mid: String, chatId: Number, customerId: Number, type: String, content: Object, createdAt: Date,});
const Message = mongoose.model("Message", MessageSchema);
async function processMessage(message) { try { await Message.create(message); console.log("💾 Message saved to database"); } catch (error) { console.error("❌ Error saving message:", error); }}Send Slack Notifications
Section titled “Send Slack Notifications”import axios from "axios";
const SLACK_WEBHOOK_URL = process.env.SLACK_WEBHOOK_URL;
async function processMessage(message) { if (message.type === "human") { await axios.post(SLACK_WEBHOOK_URL, { text: `🗨️ New customer message: "${message.content.value}"`, }); }}Trigger Email Notifications
Section titled “Trigger Email Notifications”import nodemailer from "nodemailer";
const transporter = nodemailer.createTransport({ service: "gmail", auth: { user: process.env.EMAIL_USER, pass: process.env.EMAIL_PASS, },});
async function processMessage(message) { if (message.type === "human") { await transporter.sendMail({ from: "bot@yourcompany.com", to: "team@yourcompany.com", subject: "New Customer Message", text: `Customer ${message.customerId} said: ${message.content.value}`, }); }}Best Practices
Section titled “Best Practices”Security
Section titled “Security”- ✅ Always verify the verify token before processing requests
- ✅ Use HTTPS for your webhook URL
- ✅ Store tokens in environment variables, never in code
- ✅ Implement rate limiting to prevent abuse
- ✅ Log failed authentication attempts
Performance
Section titled “Performance”- ⚡ Respond quickly — Acknowledge receipt within 5 seconds
- ⚡ Process heavy tasks asynchronously (use queues)
- ⚡ Don’t wait for external API calls before responding
- ⚡ Use proper error handling to prevent crashes
Reliability
Section titled “Reliability”- 🔄 Handle failures gracefully — Log errors and continue
- 🔄 Store webhooks in a queue for retry logic
- 🔄 Monitor your endpoint uptime
- 🔄 Set up alerts for webhook failures
Example: Async Processing Pattern
Section titled “Example: Async Processing Pattern”import Queue from "bull";
const webhookQueue = new Queue("webhooks");
// Webhook endpoint - responds immediatelyapp.post("/webhook", verifyToken, async (req, res) => { // Add to queue for async processing await webhookQueue.add(req.body);
// Respond immediately res.status(200).send("Webhook queued.");});
// Process webhooks asynchronouslywebhookQueue.process(async (job) => { const message = job.data;
// Do heavy processing here await saveToDatabase(message); await sendNotifications(message); await updateAnalytics(message);});Troubleshooting
Section titled “Troubleshooting”Webhook Not Receiving Requests
Section titled “Webhook Not Receiving Requests”Check:
- ✅ Is your server publicly accessible?
- ✅ Is your URL using HTTPS?
- ✅ Is your server running and listening on the correct port?
- ✅ Are there any firewall rules blocking incoming requests?
- ✅ Is the webhook URL correctly configured in DealDroid?
Getting 403 Forbidden Errors
Section titled “Getting 403 Forbidden Errors”Cause: Verify token mismatch
Solution:
- Verify the token in your DealDroid settings matches your server code
- Check for extra spaces or special characters
- Ensure you’re reading the
verify_tokenfrom the query parameter, not the body
Webhook Timeouts
Section titled “Webhook Timeouts”Cause: Your server is taking too long to respond
Solution:
- Respond with
200 OKimmediately - Move heavy processing to background jobs
- Use async/await properly
- Implement queuing for long-running tasks
That’s It! 🎉
Section titled “That’s It! 🎉”You’re now receiving real-time webhooks from your DealDroid bot!
With webhooks configured, you can build powerful integrations that extend your bot’s capabilities far beyond the DealDroid dashboard. Whether you’re logging conversations, triggering notifications, or building custom workflows — the possibilities are endless.
Remember: Keep your endpoint fast, secure, and reliable. Your webhook is the bridge between DealDroid and your custom systems.
Need help? We’re here to support you! 😊